Are you ready to take your WordPress website to the next level?
Imagine capturing your visitors’ attention with an interactive and captivating display of your top-notch article. A dynamic article slider is the secret weapon to achieve just that!
Whether you’re a blogger or business owner, adding an article slider can revolutionize the way you showcase your articles and engage your audience.
In this comprehensive guide on how to create a WordPress article slider, I will walk you through the simple and hassle-free process of creating a stunning article slider on your WordPress website.
Whether you’re tech-savvy or a WordPress beginner, fear not – I have got you covered. My user-friendly instructions will empower you to showcase your content through an engaging and sleek article slider in a few minutes.
So, let’s get started!
How to create an article slider on the WordPress website
You need more than the default functionalities to create an article slider on WordPress. You will need to use third-party plugins.
To create and showcase article sliders, you must use a dedicated posts display plugin. There are many post-display plugins available. But, all of them don’t offer the advanced features necessary for an effective article slider.
Fortunately, there’s Smart Post Show, a powerful yet beginner-friendly post-show plugin. It is one of the best in its category. Smart Post Show provides a wide array of advanced and powerful features. In this tutorial, I will use this plugin. Using this plugin, I will show you how to create and display article sliders on the WordPress website.
Step one: Installing and activating the Smart Post Show plugin
Install and activate Smart Post Show to create a WordPress article slider.
To do this, access your WordPress dashboard and navigate to “Plugins.”
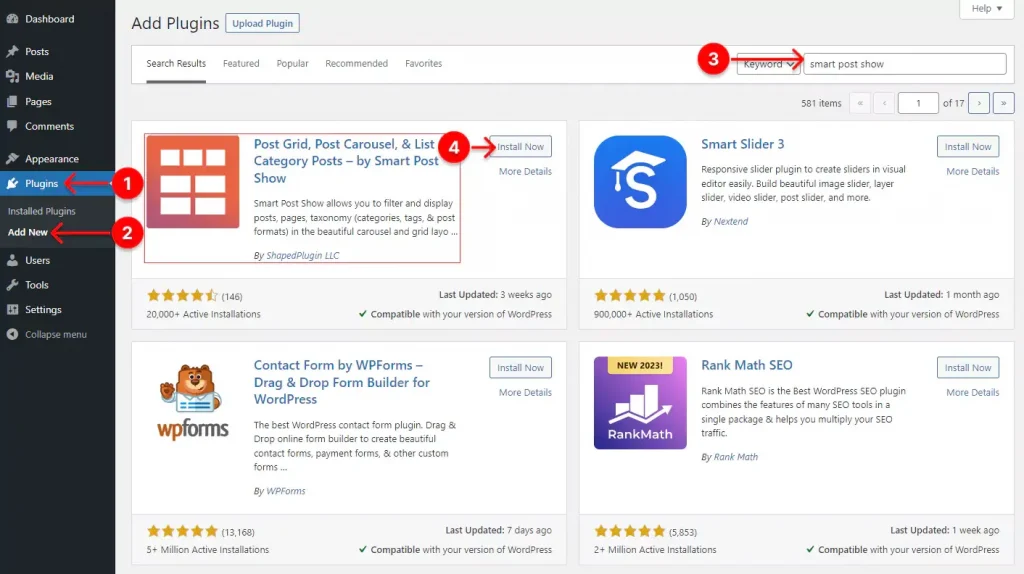
Click on “Add New” and then search for “Smart Post Show.”
Once you find it, install the Smart Post Show plugin. After the installation is complete, activate the plugin.
Congratulations! You have installed and activated the Smart Post Show plugin. Now, let’s move on to creating and displaying the article slider.
Step two: Creating an article slider
Creating article sliders with Smart Post Show is a breeze. Even people with no technical expertise can create article sliders in minutes.
To create an article slider, go to your website’s WordPress dashboard and navigate to Smart Post Show.
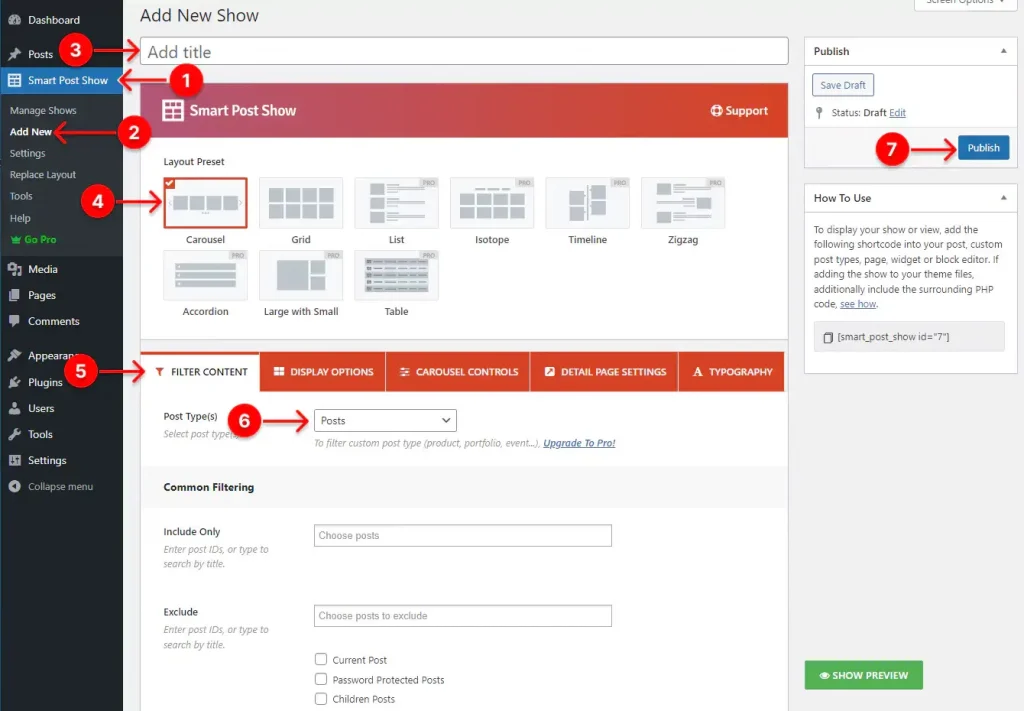
Click on “Add New,” and then provide the article slider title. After that, select “Carousel” as the layout preset from the Layout Preset options.
Next, proceed to the “Filter Content” section and choose “Posts” as the post type. Finally, click on the “Publish” button, and you are now finished creating an article slider.
Smart Post Show offers advanced customization options, allowing you to tailor the article slider according to your preferences. In the next step, I will show you how to customize the article slider to match your website and brand.
*Note: If you don’t want to customize the article slider, you can quit step three.
Step three: Customizing the article slider
The Smart Post Show plugin lets you customize every aspect of the article slider.
In the ‘Filter Content’ section, you can include specific posts in the slider. Also, you can exclude certain posts, such as password-protected, current, and children posts.
Furthermore, you can limit the number of articles you want to display on the slider.
Moreover, you can filter articles by taxonomy, author, sort by, date, status, custom field, and keyword criteria.
Using the “Display” options, you have the ability to show/hide the title, set the number of columns for specific devices, adjust the margin between articles, choose content orientation, apply borders, set border radius, define the background and inner padding, and even change the content field order.

In the “Carousel Control” section, you can customize the article carousel and navigation. Also, you can customize miscellaneous.

You can also customize the page settings by going to “Detail Page Settings”.

Also, you can fine-tune the typography in the “Typography” section.

Smart Post Show lets you customize your article slider to match your website’s style.
Step four: Displaying article slider
In the previous steps, you created and customized the article slider. Now, it’s time to display the article slider on your WordPress website.
You have the flexibility to display the article slider wherever you wish. Whether it’s on your website’s home page, blog page, sidebar, or any other location you prefer.
To display the article slider, first, access your WordPress dashboard. Next, navigate to Smart Post Show.
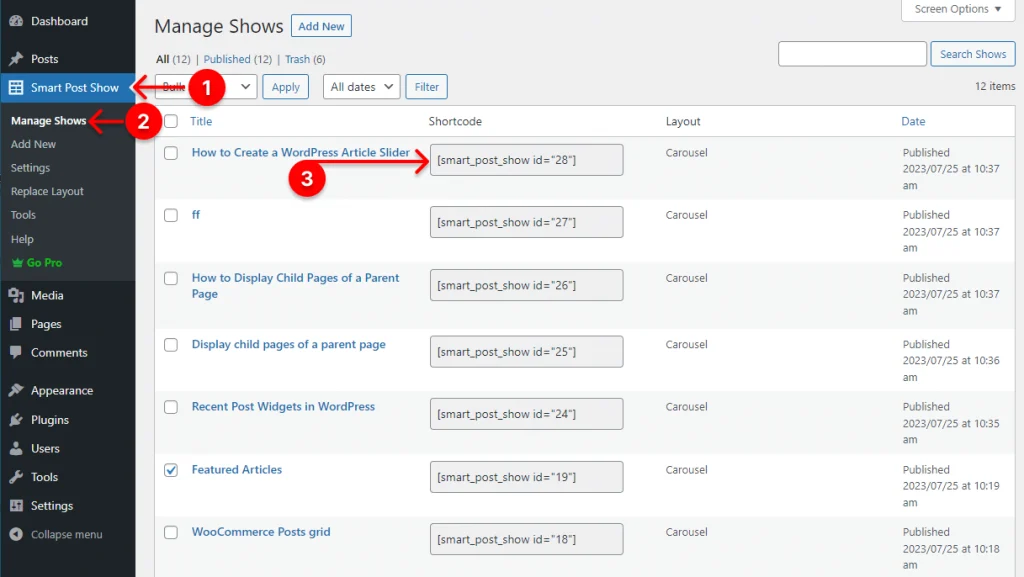
Then, Click on “Manage Show,” and then copy the shortcode of the article slider you have created.
After that, locate and edit the area where you want to showcase the article slider. In this tutorial, I will show how to display the article slider on a page. Here’s how you can do that:
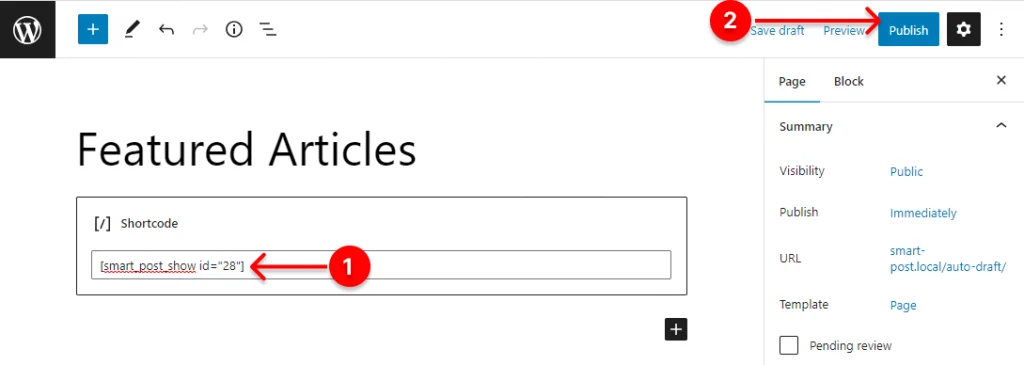
Open the page where you want to add the article slider. Then, click on the block inserter button. After that, search for the shortcode block and add it to the content area.
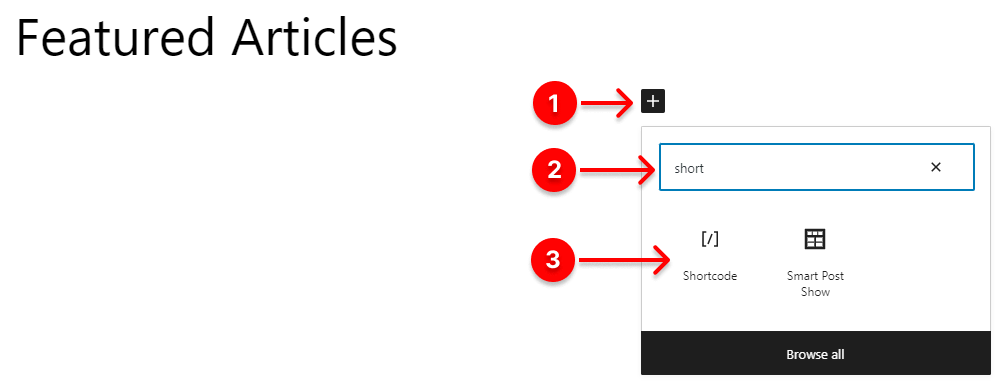
Now, paste the shortcode in the shortcode block and hit the publish button to display the article slider on a page.
Here is how the article slider looks:

The article slider makes your website more dynamic and engaging.
Wrapping Up
The article slider enhances your website content showcase. With the help of the Smart Post Show plugin, the process becomes straightforward. By following this step-by-step guide, you can create an attractive article slider. It will captivate your visitors and keep them engaged.
Remember, the article slider’s versatility enables you to display various types of content. It can showcase blog posts or featured articles, offering flexibility for your website. Take advantage of this powerful tool to highlight your best articles. It can improve your website user experience.
Now that you have the knowledge and the tool, it’s time to get creative. Use them to make your website stand out with a stunning article slider. Experiment with different settings and content choices. This will help you find the perfect combination that resonates with your audience.


Leave a Reply